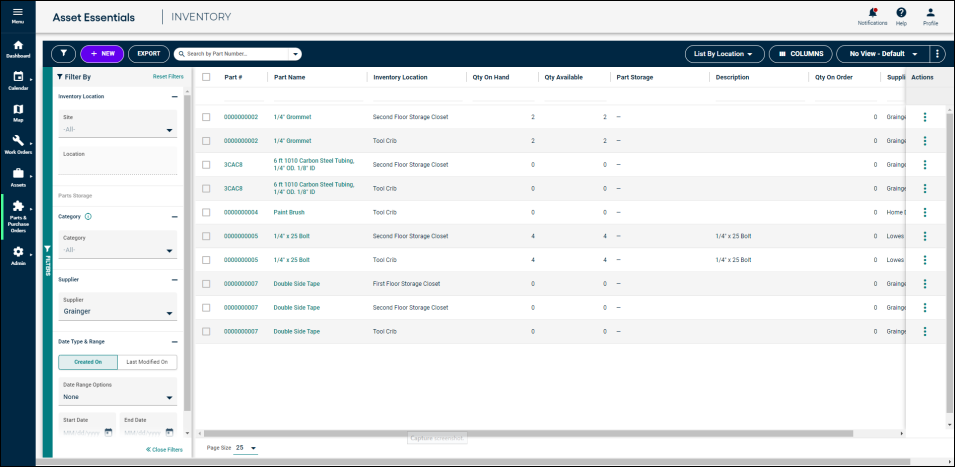
Inventory summary
*Note: The Parts & POs feature is available to Asset Essentials clients for an additional cost. Please contact your Sales Representative or Client Services if you are interested in purchasing this feature.
The Inventory summary page provides you with granular view of the inventory stored in different locations. Quickly see all of the locations where a part is stored and the quantity on hand at each. Use the filter panel to narrow your view to just the parts at a particular storage location or inventory from a particular supplier.
-
Click on Parts & Purchase Orders from the side menu, then click Inventory.
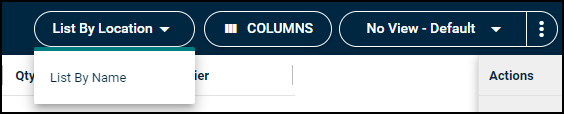
List by options
You can change your inventory summary page to either list items by location or by name. Use the drop down selector at the top of the list to toggle between the list options.
-
List By Location - This option lists inventory items with each storage location of the part listed on separate lines. This allows you to quickly see how many of that item are stored in each storage location. List By Location is the default option.
-
List By Name - This option lists inventory items by name with amounts at different storage locations rolled into one line item. To view the different storage locations for the part and the quantity on hand in each location, click on the number under the Locations column.

Selecting and moving columns
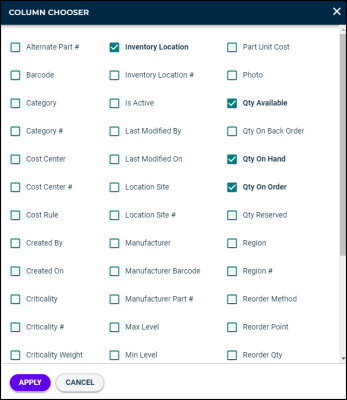
You can add, remove, and rearrange columns on the Inventory summary page to show the information you want to see.
-
Adding and removing columns
-
Click the Columns button in the top right corner of the screen to open the Column Chooser window.
-
Check the boxes next to the columns you would like to include and uncheck the boxes next to the columns you would like to remove from the summary view.
-
Click Apply.
-
-
Moving columns - Click and drag any column to the desired position on the summary page. *Note: If you drag and drop a column outside of the grid, the column will be removed from your view. If you need to pull the column back in, open the Column Chooser and select it.
-
Sorting columns - Click on the column title to sort the data in ascending order. Click on the title again to sort the data in descending order.
Filtering
Using the column filters
- To narrow down the list of parts, enter a Part #, Part Name, Inventory Location, or Supplier under the respective column header.

Using the filter panel
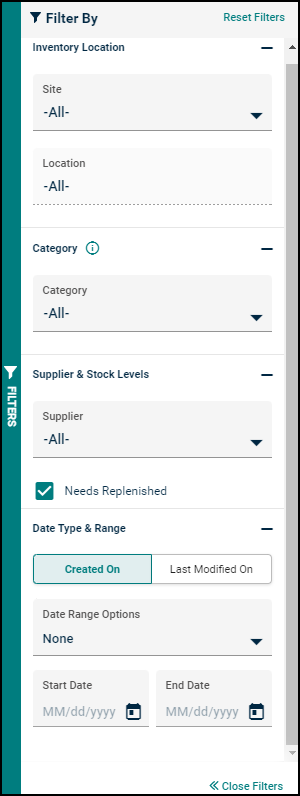
- Click either the Open Filters side bar or the filter button (
 ) at the top of the screen to open the filter panel.
 - In the Inventory Location section, you can select a Site from the drop-down menu. The Location drop-down menu will then populate with only the locations tied to that site.
- Select a Location from the drop-down menu.
- After you have selected a Site and a Location, the Parts Storage filters become active where you can further specify where the part is stored. *Note: The Parts Storage filter is only visible when viewing the summary page in the List By Location view.
- In the Category section, you can select a Category from the drop-down menu. The available categories will be determined by the selected site.
- In the Supplier & Stock Levels section, you can select the Supplier for the part you are looking for.
- Check the Needs Replenished box to only show the parts that need to be replenished.
- In the Date Type & Range section, you can choose to filter by the date the part was Created On or Last Modified On.
- Select a predefined date range from the Date Range Options drop-down menu or select Custom to choose your own.
- If you select Custom, click the calendar icon in the Start Date and End Date fields to select the desired date range.
- To clear the filters, click Reset Filters in the top right corner of the panel.
Customizing views
Asset Essentials allows you to save commonly used search and filter settings as a view. Instead of frequently selecting the same search and filter selections, you can choose a saved view from the drop down menu to automatically apply those settings to your Inventory summary page. *Note: A customized view is associated to the List By option that was selected when it was created. The view drop down will only show the customized views for the List By option that is currently selected. If you don't see a view in the list, try changing the List By option to see if the view you are looking for was saved under that option.
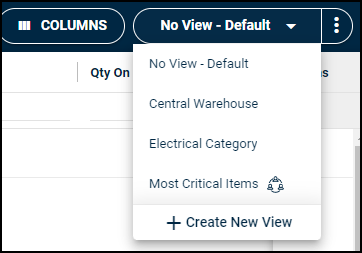
Saving a view
- Click the View drop down button.
- Click + Create New View.
- Enter a Name for the view.
- Check the Set as My Default box to automatically display this view when navigating to the Inventory summary page.
- Check the Available to others box to share this view with other users. You will see a shared icon (
 ) next to views that have been shared with others.
 - Click Save View.
Updating/Deleting a Saved View
If you need to make changes to or delete a saved view, click on the 3-dot icon ( ) next to the View drop down.
-
Click Update View to change the name of the view, set it as your default, or make the view available to others.
-
Click Set As My Default to set this view as your default view on the Inventory summary page.
-
Click Delete Selected View to delete this view.
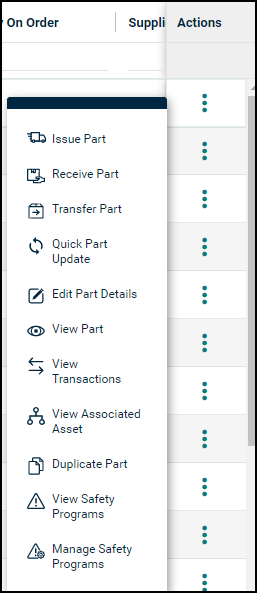
Actions menu
The Actions menu will move to the right side of the page. You can still perform all of the actions available on the current Parts summary page and have access to a few new options as well.
-
Click on the three dot icon (
 ) on the right side of the page to open the Actions menu.