GIS layers sync
Configuring GIS layers
We strongly recommend working with your Dude Solutions Implementation Specialist or Consultant when configuring your GIS layers in Asset Essentials. *Note: The GIS Asset Management feature is available to Asset Essentials clients for an additional cost. Please contact your Sales Representative or Client Services if you are interested in purchasing this feature.
- To configure your GIS layers, click on the Admin menu icon and then click Configurations.
- In the GIS Settings section, click GIS Layers.
- Click the New button.
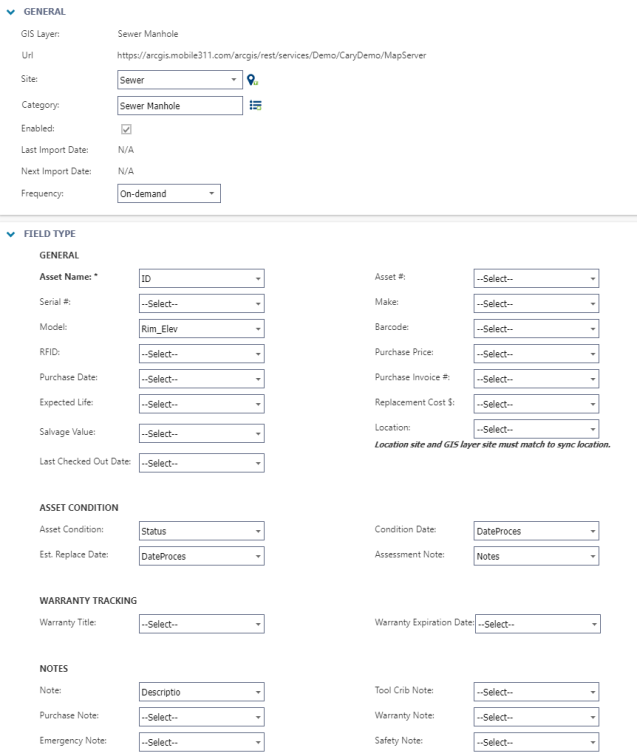
- In the General section, select the GIS Layer from the drop down. This drop down will populate with information obtained from your GIS data set up in the Map Configuration settings. *Note: A layer must contain Global IDs in your GIS data in order to be added to Asset Essentials.
- Select a Site if the GIS Layer information only pertains to a particular Site.
- Select a Category by clicking the categories icon (
 ) for the Layer. *Note: As best practice, we recommend creating an asset category to represent the layer if a category doesn't already exist.
 - Set a Frequency for how often Asset Essentials will sync and receive data from your GIS data.
- In the Field Type section, you can map the data being pulled from your GIS information to the Asset fields. *Note: When synced, the transfer of data is one-way to Asset Essentials.
- The Purchase Price, Expected Life, Replacement Cost, and Salvage Life Asset fields must be mapped to GIS fields that are in a numeric format.
- The Purchase Date, Last Checked Out Date, and Warranty Expiration Date Asset fields must be mapped to GIS fields that are in a date format.
- The remaining Asset fields must be mapped to GIS fields that are in a text format.
- Be sure to select the most appropriate option for the Asset Name field. While this is the only required field, we recommend mapping as many fields as you can. *Note: As a best practice, we recommend using a field that contains unique identifiers for your GIS features.
- The Asset # must be unique across Asset Essentials. *Note: We recommend that you do not map GIS layers to the Asset # field so that the system can auto generate the asset number for you.
- Click Save at the top of the screen.
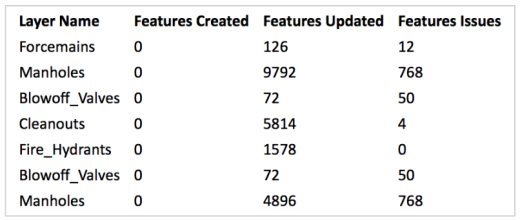
On the GIS Layers summary page, the sync icon ( ) will appear gray while syncing your data to Asset Essentials. Once finished the sync icon will turn blue again. *Note: Only a Global Administrator will see the sync icon on the summary page. While syncing, refresh the page and the Running check box should appear as checked. When checked this will indicate to other users that the sync is in progress.
Setting up subscriber alerts
Asset Essentials can email users the results of a sync. To set up subscriber alerts:
- Click on the Admin menu icon and then click Configurations.
- In the GIS Settings section, click GIS Layers.
- Click the Select Me (
 ) icon to add yourself as a Subscriber or click the Select User (
 ) icon to select other users.
 - Click the Save button.
- Asset Essentials will now send an email with the results of each sync to the listed users.