- Click on the Request Facility Use tab. *Note: If this is your first time making a request through CommunityUse, you will be asked to read the terms and conditions that the district provides. You will also be asked to verify that you agree to these terms each time you submit a request.
- Choose the type of schedule you would like to submit.
- A Normal Schedule can be for a single date or multiple dates, but each event will be in the same location and room at the same time of day. You can request up to a maximum of 20 dates on a normal schedule.
- The Recurring Schedule is used for an event that takes place on a regular basis (Example: every Monday and Wednesday from October through December). These events will also be in the same location and room at the same time of day. You can enter up to a maximum of 100 dates on a recurring schedule.
Watch the Video Tutorial:

Facility Use Request Wizard
Note: Any field marked with an orange line is a required field.
Step 1 - Search
- Enter the Event Title.
- Enter an Event Description.
- Select the Location and Room(s) you would like to reserve for your event.
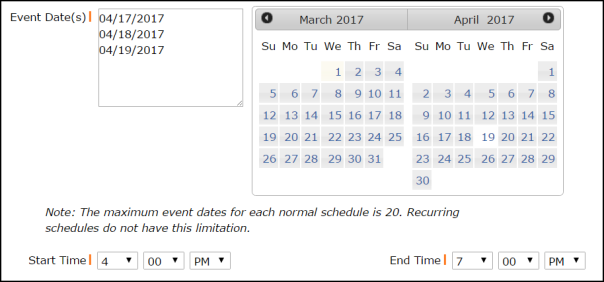
- If entering a Normal Schedule:
- Enter the Event Date(s) by typing into the box or clicking on the dates in the calendar box to the right.
- Enter the Start Time and End Time, making sure to select AM or PM in the drop down boxes.
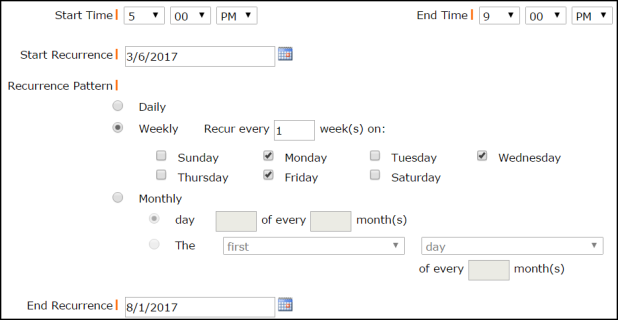
- If entering a Recurring Schedule:
- Enter the Start and End Time, making sure to select AM or PM in the drop down boxes.
- Enter the Start Recurrence date.
- Choose your Recurrence Pattern:
- Select Daily if your event will occur every day between the start and end dates.
- If you choose Weekly, you can select if the event occurs every 1 week, every 2 weeks, etc. Then put a check mark next to the days of the week that the event will occur.
- If you choose Monthly, you can select the day of the month (for example, the 15th day of every 1 month) or you can choose the weekday of the month (for example, the second Monday of every 1 month).
- Enter the End Recurrence date.
- Click on the Search button to make sure that the room you are requesting is available.
Step 2 - Availability
- Your requested rooms will show at the top, and the time frame you've requested will show in yellow. If you see a black or red X in the box, there is already an event scheduled at that time.
- If the selected rooms are available at your desired time, click Next to proceed with your request.
- To change the room, date, or time of your request, click Previous to make new selections.
Step 3 - Event Details
Additional Information
- This section may or may not appear on your request form depending on how your Administrators set up your account.
- If this section does not appear on your form, answer the available questions providing additional information for your event.
Organization Information
- Select your Organization that is requesting the facility from the drop down menu.
- Select the Contact in the drop down box.
Services
- The Services feature may or may not be available on the form.
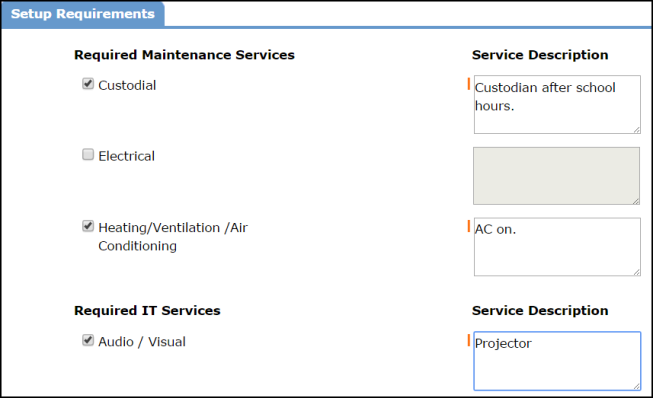
Setup Requirements
- If Maintenance Services or IT Services are needed for your event check the box next to the service needed and enter a Service Description in the box.
Rental Requests
- If there are rental items available in this section, select the ones needed for your event, enter the Quantity, and write a Rental Description.
Event Information
- Enter Total Attending. You can also break this number into number of adults and number of children.
- Enter the number of Extra Chairs Required for the event.
- Enter the number of Parking Spaces Required for the event.
- Check the Yes, please display events on the community calendar if you would like the event to appear on the calendar.
- Enter any Other Needs if needed.
File Attachments
- Attach a file to your schedule request by clicking the Add New File link.
- Browse your computer for the file and select it. *Note: The file name may not contain a space or an underscore ( _ ).
- You can also enter a File Description. Click Submit.
- The attached file will now be listed in the File Attachments section at the bottom of the schedule. *Note: There is no limit to the number of files that can be attached; however, the total size of all uploaded files on the schedule must be less than 5 MB.
Signature
- Enter your email address in the Signature box.
- Check the box stating that I confirm that I have previously read and agree with the terms and conditions of facilities use.
- Click Save to submit your request.
Step 4 - Confirmation
The Confirmation page will give you the Schedule ID number for your request and a summary of the event information. You can print this page for your records.
