Watch the Video Tutorial:

- Once logged into MySchoolBuilding, make sure you are on the IT Request tab at the top of the screen. *Note: Any field marked with a red checkmark is a required field.

- Step 1: These fields will already be filled in with your contact information according to how it was entered upon registration.
![]()
- Step 2: Click on the drop down arrow and highlight the Location where the work needs to be done. Do the same for Building (if available) and Area. Also, be sure to type in the area description or room number in the Area/Room Number field.

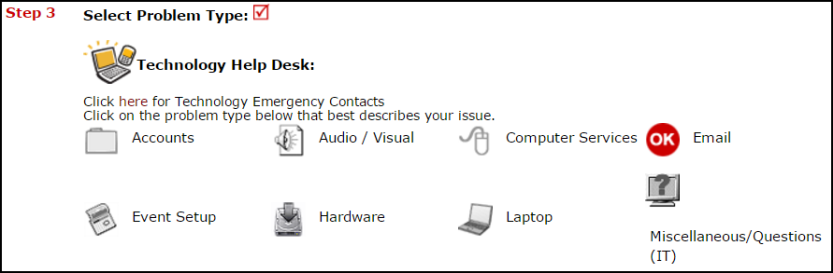
- Step 3: Select the Problem Type that best describes the request/issue you are reporting.
- Step 4: Type in a Description of the problem.

*Note: The following fields may or may not be available on your request form depending on how the Administrators have set up the account. Remember to fill out any required fields marked with a red checkmark before submitting your request.
- Step 5: Depending on the technology problem type you selected in Step 3, there may be extra questions to answer here that will give more detail about your request. Fill out the Questionnaire and remember that any fields with a red checkmark beside it are required.
- Step 6: Enter a Tag Number if necessary for a specific piece of equipment that needs to be worked on.
- Step 7: Enter a Time Available, such as a planning period, when workers can come by.
- Step 8: Select a Purpose for the work if applicable.
- Step 9: Enter the date you would like to have the work completed by.
- Step 10: Select the Budget that will apply to costs related to this IT request.
- Step 11: Attach a file to the request if necessary (i.e. a picture of damage or a screenshot).
- Step 12: Type in the Submittal Password provided to you by your Administrator. *Note: If you are a returning user and you have forgotten the Submittal Password, click Forgot Password? to have the password emailed to you.
- Step 13: Click the Submit button.
