Entering a New Work Order
Watch the Video Tutorial:

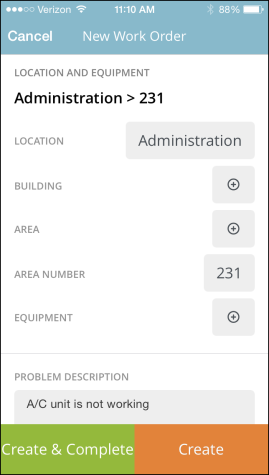
- Tap New Work Order on the menu screen.
- Tap the plus sign icons (
 ) to select the Location, Building, Area, Area Number, and Equipment if needed.
 - Enter the Problem Description. You can use voice-to-text to enter this information as well.
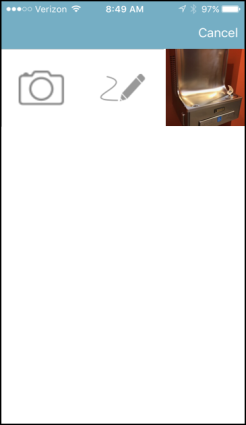
- To add an Attachment, tap the plus sign icon ().
- Tap the camera icon (
 ) to take a new photo, tap the pen icon (
 ) to add a signature, or choose to add a photo from the list.
 - You can remove the attachment by tapping the trash can icon (
 ) or add another attachment by tapping the plus sign icon ().
- Tap the camera icon (
- Select the Priority.
- Your information will appear as the Requester info, but you can tap your name to change the requester to an existing user in the list.
- Select an Assigned To (available only to Administrators and Supervisors), Craft, and Purpose for this work request.
- Click Create to submit the work order.
- Click Create & Complete to enter an Action Taken, adjust the timer, and mark the work order complete.
Assigning a Work Order
Watch the Video Tutorial:

- Tap Unassigned Work Orders on the menu screen.
- Swipe the work order you want to assign to the right (
 ).
).
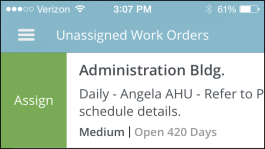
- Select the User's name from the list.
- You can also reassign a work order to a different user if needed. Tap to open the work order and scroll down to the Assigned To field. Tap the assigned user's name and select a new user from the list.
Editing Work Orders
Adding Attachments/Signature to an Existing Work Order
WorkCenter gives you the ability to add attachments to a work order such as a photo or a signature indicating that the work order has been complete.
Watch the Video Tutorial:

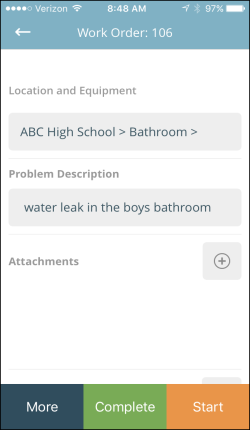
- Search for and tap on the work order you would like to add the attachment or signature to.
- Tap the plus sign icon () next to Attachments.
- Tap the camera icon () to take a new photo, tap the pen icon () to add a signature, or choose to add a photo from the list.
- You can remove the attachment by tapping the trash can icon () or add another attachment by tapping the plus sign icon ().
|
|
Processing PM Work Orders
When handling a PM work order in WorkCenter you will see the PM work order's tasks and procedures listed in the work order details.
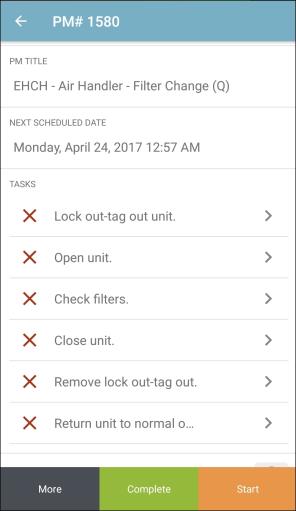
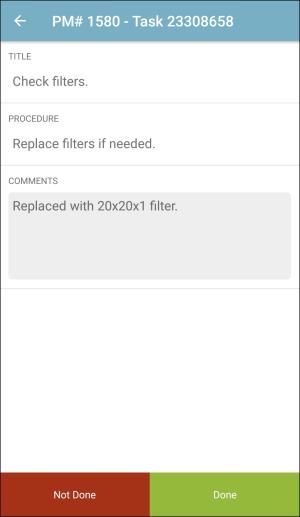
- Tap on an individual task to view more details.
- If applicable, you can see additional details on the task in the Procedures section.
- Tap the Comments section to enter any notes necessary. *Note: You can use voice to text to enter information in this field.
- Tap the Done button to mark the task as complete.
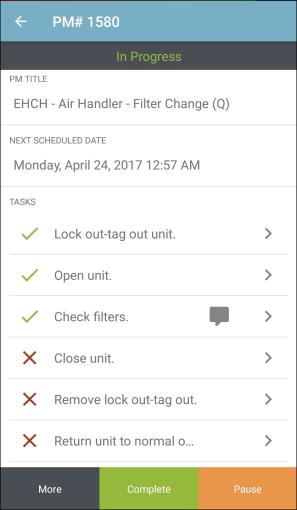
- As you complete tasks on the PM work order, you will notice that completed tasks will change from a red x to a green check to indicate completion. Any tasks where comments were made will show a comments icon next to the task.
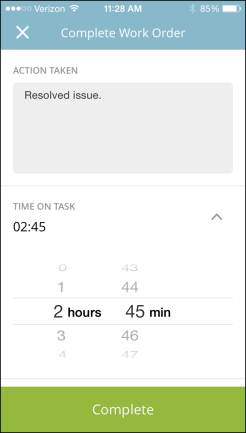
Completing a Work Order
- From your My Open Work list, swipe to the right () on the In Progress work order you would like to complete.
- Or tap on the work order from the list and tap Complete.
- Enter an Action Taken Description. *Note: You can use voice-to-text to enter information in the Action Taken field.
- Adjust the Time on Task timer if necessary.
- Tap Complete at the bottom of this screen to record the labor hours from the timer and mark the work order Complete.
- Once you mark a work order complete, it will move from the My Open Work Orders screen to the My Finished Work Orders screen.