Managing Payments
Once an invoice has been created, you have the ability to apply a payment to that invoice. There are a few different ways to post a payment in FSDirect. You also have the ability to edit or delete a payment if an amount was entered incorrectly.
How to Post a Payment
Option 1
-
Click on the Add link in the Actions Menu.
-
Click the Payments link.
-
Enter the Invoice Number. The screen will refresh to show the Invoice Total and Current Outstanding amounts.
-
Select the Payment Type and enter the Payment Amount. *Note: If you are posting the payment in full, we recommend checking the box next to Close Invoice.
-
Click Save.
Option 2
-
Type the schedule number into the Search for field and click Go. This will take you to the Update Schedule screen.
-
Hover your mouse over the Shortcuts menu and click on Invoicing. This link will take you to the Invoices section at the bottom of the schedule form.
-
Click on the Add New Payment link.
-
You will now be on the Add Payment screen. Select the Payment Type and enter the Payment Amount. *Note: If you are posting the payment in full, we recommend checking the box next to Close Invoice.
-
Click Save.
Option 3
-
Type the invoice number into the Search for field and click on Go. This will take you to the Update Invoice screen.
-
Scroll to the bottom of the page and click on the Post Payment link.
-
You will now be on the Add Payment screen. Select the Payment Type and enter the Payment Amount. *Note: If you are posting the payment in full, we recommend checking the box next to Close Invoice .
-
Click Save.
Option 4 - Online Payment (only available to EventEssential Pro clients)
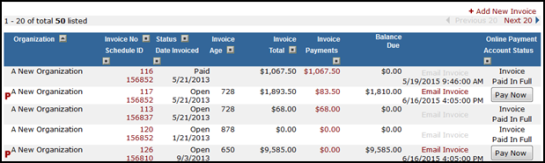
Site Administrator IIs can access the online payment feature from several places in the account. Click the Pay Now button to enter the payment information.
- My Invoices page - Click on the Invoices link under the Information & Analysis section.
- Invoice Detail page - Search for or click on the Invoice ID number.
- Schedule Detail page - Search for or click on the Schedule ID number.
- Invoice Advanced Search page - Click on the Advanced Search link then hover your mouse over the Shortcuts menu and click on Invoice Search. Select any combination of items from each of the fields and click the Search Now button at the bottom of the page.
| My Invoice Page | Invoice Detail |
|
|
| Schedule Detail |

|
| Invoice Advanced Search |

|
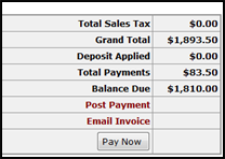
- You are now on the payment portal. Choose the type of payment, ACH (checking or savings account) or Credit Card.
- Enter your payment information and click Complete Payment. You will receive a confirmation page when your payment is made.
How to Delete or Edit a Payment
Watch the Video Tutorial:
Option 1
-
Click on the List link in the Actions Menu.
-
Click on the Payments link.
-
You can sort the list in ascending or descending order by clicking on the gray box next to Invoice No.
-
Click on the dollar amount under the Received Payments heading to access the Update Payment screen.

-
To delete the payment, click the Delete button at the bottom of the screen.
-
To edit the payment, just update the Payment Amount box and click Save to update.
Option 2
You can also access the Update Payment screen by running an Advanced Search for the payment.
-
Click on the Advanced Search link.
-
Hover your mouse over the Shortcuts menu and click Payment Search.
-
Enter your search criteria in the fields to pull up the correct payment and click Search Now.
-
Click on the dollar amount under the Received Payments heading to access the Update Payment screen.
-
To delete the payment, click the Delete button at the bottom of the screen.
-
To edit the payment, just update the Payment Amount box and click Save to update.
