Building Level Approval Routing
Building and Room routing can be one of the more complex setup options in FSDirect. In certain situations, schedules may not route as intended depending on how the routing was established. This usually occurs when an Irregular Schedule is selected OR when a Normal or Recurring schedule has multiple rooms selected. This document will explain how Building level routing works and will offer some solutions as to how to set this up.
When you're looking at a routing table as shown in the image below, a Submitted request for a single room will follow the routing correctly.

When multiple rooms are selected on a schedule, FSDirect will look to the next highest level route. This is typically the Location level route. A common problem is that the Location level approvers are usually Site Administrators and these user roles cannot manually route schedules. That can only be done by an Administrator.
Per the screen shot below, if both the Auditorium and the Cafeteria are select on the same schedule request form, the request would not go to the Site Administrator (Melody Pond) as we would have hoped. Instead, it will follow the Location level route (Sam Clark).
The below screen shot provides a routing example where NO Location level route has been established. If a request is made which includes the Cafeteria and Classroom 123, the system will send the request to the Comptroller. If no Comptroller is indicated in the Account Settings, then the request will route to no one.

How to Set Up Building Level Routing
Building level routes will allow you to properly route schedules which have multiple spaces selected. There are a few steps that you will need to take before establishing this type of route:
- In the Actions menu, click on Add and then click on Buildings.
- Select the Location.
- Add the new Building Name (such as Athletic Spaces).
- Click Save.
Now you will need to associate the Building name with the Room(s).
- Click on List from the Actions menu and then click on Rooms.
- Click on the Room name from the list.
- Select the Building from the drop down menu.
- Click Submit.
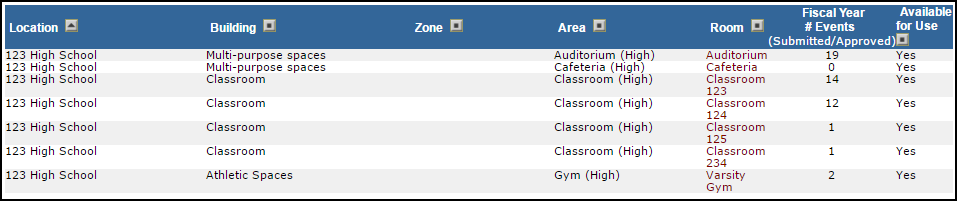
Here is an example of what your room list should look like:
Now we need to build the new route:
- On the Account Setup tab, click on Setup Schedule Status Routes.
- Click +Add New.
- Select Submitted as your status.
- Select the Location and the new Building that you just added.
- Select No One in the When Routed To box and select the approver's name in the Route to Next box.
- Click Add New to save.

Now, when multiple rooms are selected on a schedule, the next highest level of routing for the system to default to is Building level. Multiple rooms selected under the same Building will now route correctly!
- In addition to the requests now routing properly, this change can also decrease the total number of routes that appear in your FSDirect account. Individual Room level routes are no longer required.
- The users selecting the Rooms on the schedule will not be required to select a Building. As long as the Room is tied to the appropriate Building in the Room setup, the routing should work correctly.
- If Rooms that are assigned to different Buildings are selected on the same schedule, or if a selected Room does not have a Building associated with it, then the request will default to the next highest level route (typically the Location route).
- Per the example above, if a Multi-purpose space room and any other room (Classroom, Gym, etc) are selected on the same schedule request, it will follow the Location level route (Sam Clark).
- If all routes are set to Building level and a request is made across Buildings, the request will route to the Comptroller.
