Editing Active Schedules
Once a schedule has been activated, meaning that it has received final approval, you are restricted from making certain changes to that schedule. However, if you need to edit an active schedule, you have 3 basic options, each with its own set of advantages and disadvantages. You can:
- Change the schedule status back to Submitted, make the changes, and re-activate the schedule.
- Use the Alternate Event Location/Date/Time option to modify each event one at a time.
- Mark the schedule as a Duplicate and use the Renew feature to copy the information onto a new schedule form.
Option 1: Change the Status Back to Submitted
Once a schedule has been activated, you cannot edit the Location, Room, Date, or Time fields. If you need to move a large number of events on a schedule to a new time, change the duration, add or remove rooms, or move to another location, then changing the schedule back to the Submitted status may be the best option for you.
However, there are some limitations to this. Changing the status back to Submitted will not open the schedule form for changes if any or all of the following are true:
- There are Invoices tied to the schedule.
- There are Canceled or Alternate events.
- A Setup Task email has been sent.
If any of the above have occurred and you have more than a handful of Events to edit, then you will want to use the third option, Duplicate and Renew.
How to Change the Status Back to Submitted
- From the Update schedule screen, change the Status from Approved to Submitted.
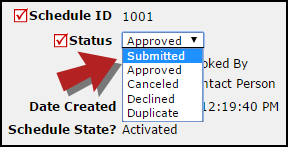
- Once the page refreshes, you can then make changes to the schedule. The Location, Room, Date, and Time fields will no longer be grayed out indicating that you can make your corrections.
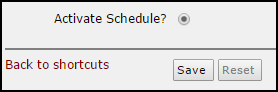
- After you have made the changes, scroll down to the bottom of the page. Select to Activate the schedule and click Save.
Option 2: Use Alternate Event/Location/Date/Time
You can create an Alternate Event/Location/Date/Time through the Schedule Form or through the Calendar.
How to create an Alternate Event within a Schedule
- Pull up an activated schedule. You can do this by typing the schedule number into the Search for box and then click Go. This will take you to the Update Schedule screen.
- Hover your mouse over the Shortcuts menu and then click on Events. This link takes you to the Events section at the bottom of the schedule.
- Click on the Event Date displayed in red. You are now on the Event Details page.

- Click on the Alternate Event Location/Date/Time button.
- Edit the information that needs to be changed for that date. (Location, Room, Time, etc.)
- Click Save.
How to create an Alternate Event through the Calendar
- Click on the Calendar tab.
- Select the Location from the drop down menu then click on the Refresh Calendar button.
- Find and click on the Event Title. You are now on the Event Details page.
- Click on the Alternate Event Location/Date/Time button.
- Edit the information that needs to be changed for that date. (Location, Room, Time, etc.)
- Click Save.
Option 3: Duplicate and Renew
Watch the Video Tutorial:

- Pull up the schedule by typing the schedule number into the Search for field and clicking Go. This will take you to the Update Schedule screen.
- Change the Status in the drop down box at the top of the screen to Duplicate. This will remove this schedule from the calendar.
- Scroll toward the bottom of the schedule and click Save.
- Hover your mouse over the Shortcuts menu and click on the Renew link.
- A new schedule form will open with the all of the information from the original schedule, except for the event date(s), filled in for you.
- Select the event date(s) and make any other changes to the information as needed.
- Click Save at the bottom of the screen to enter the new schedule.
