Canceling Events and Schedules
Watch the Video Tutorial:
How to Cancel an Event
You can cancel an event from either the schedule form or from the calendar page:
- Pull up an activated schedule. You can do this by typing the schedule number into the Search for box and then click Go. This will take you to the Update Schedule screen.
- Hover your mouse over the Shortcuts menu and then click on Events. This link takes you to the Events section at the bottom of the schedule.
- Click on the event date displayed in red.
OR
- Click on the Calendar tab.
- Select the Location from the drop down menu then click on the Refresh Calendar button.
- Find and click on the event title.
You are now on the Event Details page. Scroll to the bottom of the screen and you will see 3 cancellation options.
-
Cancel Event: This is the most common option. This allows you to cancel just the one date that you clicked on from the previous screen.
- Cancel Event from (Insert Date) forward: This allows you to cancel all event dates from the selected date forward.
- Cancel Entire Schedule: This allows you to cancel the entire schedule.
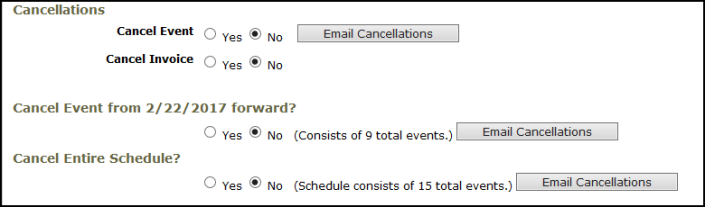
Once you have made your selection, click the Save button.
- Click on the Email Cancellations button to send email notifications to advise of the canceled event.
- The email addresses that appear in the To box will be the Booked By (the person who entered the request) and the Organization Contact. The other email addresses depend on how your email notifications are set in your account. You can add additional email addresses to the message, just separate them with a semicolon.
- The Message box contains details about the event. You can alter or add to the text if needed.
- Click the Send Email Cancellations button to send the email.
*Note: When you cancel a single event date, the details will still be displayed on the calendar. There will be an icon displayed to the left of the event which will indicate that it has been canceled.
How to Cancel a Schedule
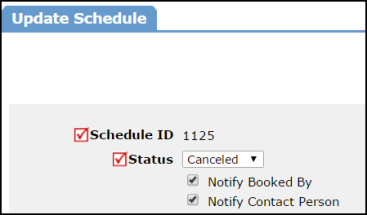
- Pull up an activated schedule. You can do this by typing the schedule number into the Search for box and then click Go. This will take you to the Update Schedule screen.
- Change the Status to Canceled. You can uncheck the boxes next to Notify Booked By (the person who entered the request) or Notify Contact Person (the organization contact person) if you do not want the system to generate an email notification.
- Scroll to the bottom of the schedule and click on the Save button.
*Note: Canceling a schedule will cancel all event dates within the schedule. The details will no longer be displayed on the calendar.
