Back to Energy Manager Main Menu
Allocations
The Allocations feature allows you to use a single bill from a utility vendor and distribute the amount to one or more subsidiary accounts within your organization. The distribution can be based on meter readings, fixed percentages, or a combination of both. *Note: If you do not currently have access to the Allocations feature, please contact your Sales Representative or Client Services for more information.
Master and subsidiary accounts
Before a bill can be allocated, the account associated with the bill must be defined as a Master account. The Master account is where you will enter the total amount of use and cost provided on the bill. This amount is then distributed to one or more Subsidiary accounts.
Any account can be used as a master account and may have one or more subsidiary accounts associated with it. Each Subsidiary account can, in turn, be a Master account to one or more additional Subsidiary accounts creating a hierarchy of accounts. A Master account which is also a subsidiary to another Master account is called a Sub-Master account in Energy Manager. *Note: An account can only be a subsidiary to one Master or Sub-Master account.
How to define the master account
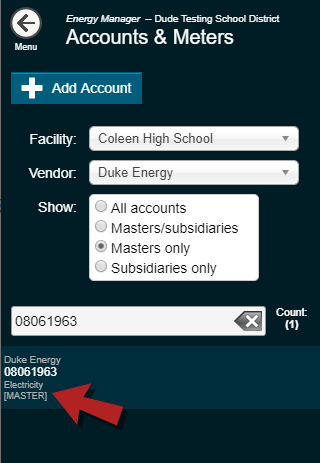
- Click on Utility Accounts from the navigation menu and then click on the Accounts & Meters panel.
- Use the search filters listed on the left or enter the account number to search for and select the Account from the list that displays.
- On the General tab, in the Allocation type(s) section, check the Master Account box. *Note: The Subsidiary Account box will be disabled. This box will be checked automatically by the system on a Subsidiary account when it is assigned to a Master account.

- Click Save. The Account will then appear on the account list with the label "MASTER."
How to assign a subsidiary account
A Master or Sub-Master account must have at least one assigned Subsidiary account. Additionally, each meter associated with the Master account must have a matching meter of the same Service and Units in each Subsidiary account.
- Select the Allocations tab from the Master account.
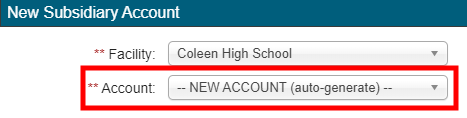
- Click the Add Subsidiary button.
- Select the Facility.
- From the Account drop-down menu, select an existing account or choose "NEW ACCOUNT (auto-generate)" to create a new account number for this subsidiary. *Note: When creating a new account, the system will indicate it is a subsidiary by appending "SUB” to the Master account number.
- In the Allocations section, select the Allocation Type.
- Select the Fixed % option when the subsidiary’s allocation is based on a percentage of the total bill. This percentage can be based on the square footage of a facility, average historical usage, or other metrics. *Note: Regardless of the number of Subsidiary accounts for a Service, at least one of those accounts must have an Allocation Type defined as a fixed percentage. If there are multiple Subsidiary accounts defined as a fixed percentage, the total of the fixed percentages for each Service must equal 100%.
- Enter the % Allocation that will be used to calculate the distribution.
- Select the Meter reads option when the subsidiary’s allocation is based on a meter reading. *Note: When a Subsidiary account’s allocation is meter-based, there are key fields that are associated with a meter reading.
- If the Allocation Type for the Subsidiary account is not based on a fixed percentage or meter reading, select the N/A option. For example, when entering a master bill that lists water and waste water, use the N/A option to exclude the waste water portion from the subsidiary bill.
- Select the Fixed % option when the subsidiary’s allocation is based on a percentage of the total bill. This percentage can be based on the square footage of a facility, average historical usage, or other metrics. *Note: Regardless of the number of Subsidiary accounts for a Service, at least one of those accounts must have an Allocation Type defined as a fixed percentage. If there are multiple Subsidiary accounts defined as a fixed percentage, the total of the fixed percentages for each Service must equal 100%.

- In the Meter mapping section, use the Subsidiary Meter drop-down menu to select an existing meter or choose "NEW METER (auto-generate)" to create a new meter number for this subsidiary. *Note: When creating a new meter, the system will indicate it is a subsidiary by appending "SUB” to the Master Meter number.

- Click Save.
Meter readings
When a Subsidiary account’s allocation is meter-based, there are key fields that should be reviewed on the Meter.
- On the Accounts & Meters panel, search for the Subsidiary account.
- Select the Account from the list.
- Select the Meters tab.
- Select the Meter Name, then select the General tab.
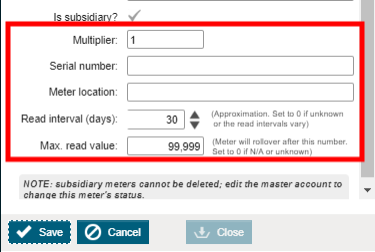
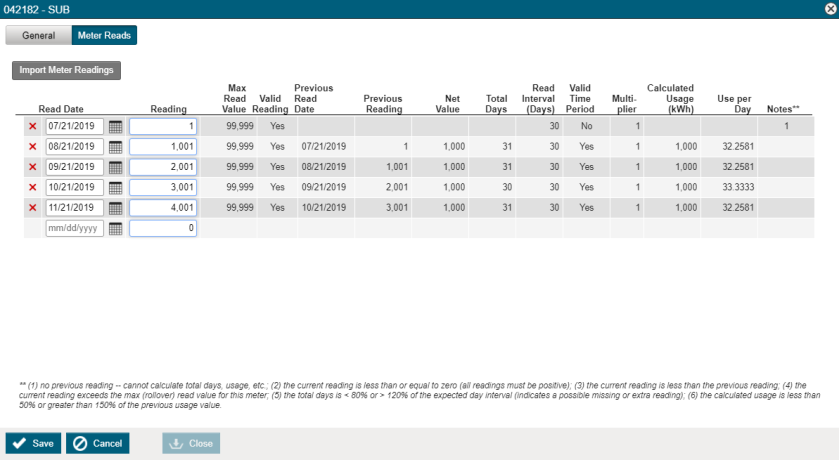
- Enter the meter Multiplier. This number will be multiplied by the difference between your present and previous readings to calculate your actual energy use. *Note: The system requires a multiplier value to calculate usage from a meter reading. If the meter does not require a multiplier, enter a value of 1.
- In the Read interval (days) field, enter the average number of days between meter readings. *Note: This is an optional field and can be used to flag missed readings. Enter 0 if the read interval varies or is unknown.
- The Max. read Value is used to indicate when the meter reaches its rollover point and is reset to zero. *Note: This is an optional field and can be used to calculate usage when the current meter reading is less than the prior one. The system will also flag readings greater than this value as invalid. Enter 0 if the read value does not apply or is unknown.
- Click Save.
How to Enter Meter Readings
- On the Accounts & Meters panel, search for the Subsidiary account.
- Select the Account from the list.
- Select the Meters tab.
- Select the Meter Name, then select the Meter Reads tab.
- To enter a single reading, enter the Read Date and Reading of the meter.
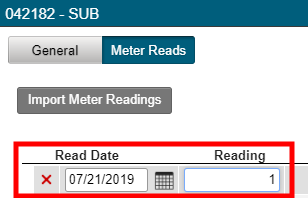
- Alternatively, you can enter multiple readings at once by clicking the Import Meter Readings button.
- Before importing your meter readings, you will need to create a comma-separated values (CSV) file with the following fields, in this order:
- Account Number (50 chars max)
- Meter Number (100 chars max)
- Facility Name (80 chars max) - can be blank
- Facility Number (50 chars max) - can be blank
- Vendor Name (50 chars max) - can be blank
- Vendor Number (50 chars max) - can be blank
- Read Date (formatted as MM/DD/YYYY)
- Meter Reading (number greater than 0)
- Click Choose File and select the CSV file.
Setting Header rows tells the system how many rows to ignore at the top of the file.
- Check the Overwrite data box to replace existing meter readings.
- Check the Current meter only box to exclude readings that are not associated with the current meter.
- Click the Upload button.

- Click Save.
Master bills
After entering a bill for the Master account, the system will create additional line items. The line items will have negative Usage, Cost, and fee values to offset the amounts allocated to the subsidiary bills. *Note: For certain line items related to electricity, such as Power Factor, kVAR, and kVARh, the Usage will not reflect a negative value and will not be allocated to subsidiary bills. Demand values will be allocated to your subsidiary bills if the Apportion demand (allocated bill) box is checked in the General Info Settings under Organization Setup.
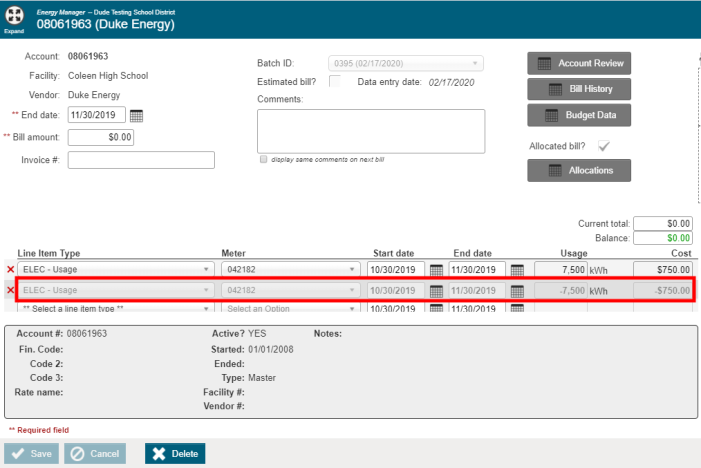
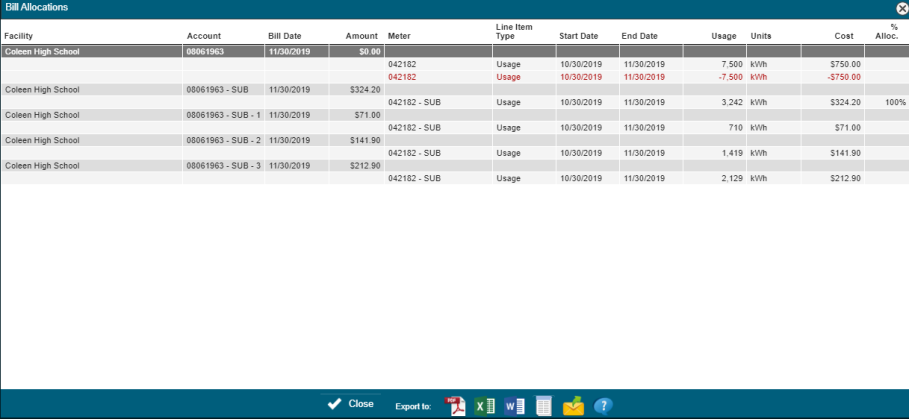
- On the Master account, click the Allocations button to view a breakdown of the allocation to the Subsidiary accounts. *Note: For Subsidiary accounts based on a meter reading, the amounts are prorated to handle differences in the billing dates and the meter reading dates. Any remaining amount is distributed to the fixed percentage Subsidiary account.
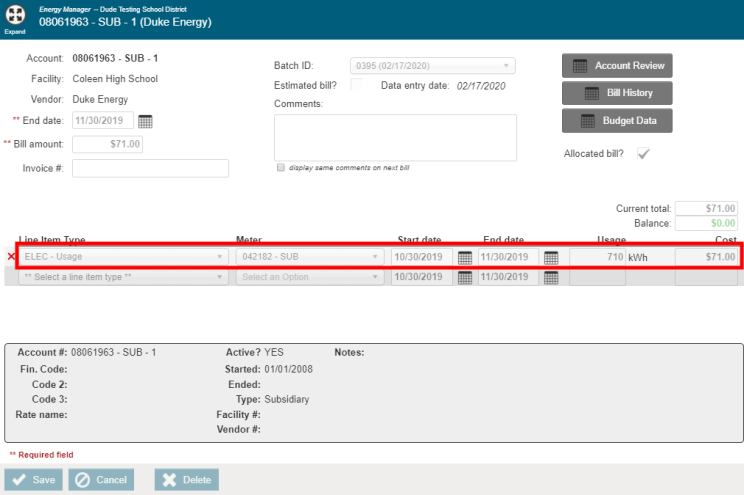
Subsidiary bills
Once you enter a bill for a Master account, a bill is automatically created for each Subsidiary account.
- To view the individual bill for a Subsidiary account, select the Account from the Utility Bills panel. * Note: Any subsidiary bill that is directly associated with a master bill cannot be edited or deleted and will be read-only.